How to Edit WordPress Theme CSS Styles
It is fairly easy to edit a WordPress template. Even though many templates have a lot of CSS files, you usually just need to find the right one which contains the most important styles and fonts you may want to change. We recommend you in the first place to use Mozilla Firefox to help you edit WordPress templates. Firefox is an excellent browser, but it also offers a special editing tool called Firebug. By using the Firebug add-on you can easily test changes and find everything you need to know about certain CSS style file.
Install Firebug
Firebug works best with Firefox. It also comes in a lite version for Chrome, but I’d recommend you to use Firefox and Firebug combination. You can download it by searching on Google for “Firebug add-on install” and then installing the add-on onto your Firefox browser. You can install Firebug just as any other Firefox add-on.
Launching Firebug
Once Firebug is installed, you can activate the add-on.

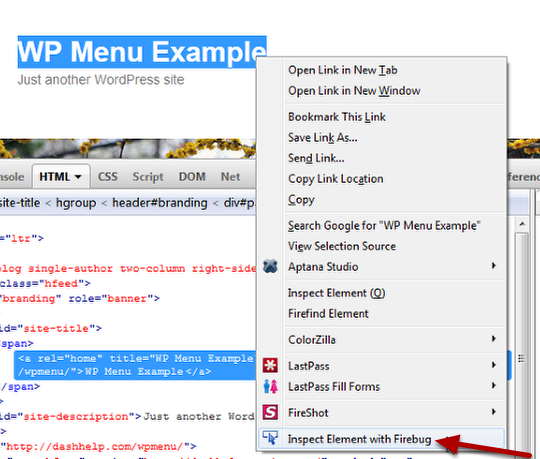
You can activate Firebug by clicking on the Firebug icon in your toolbar. Next, highlight or place your mouse over the element you want to edit. For example, if you would like to edit your h1 tag, you can select your h1 title. Right click on the h1 title and choose the option “Inspect Element with Firebug”.
Understanding Firebug
Now that you have activated the Firebug add-on, there are several things you need to pay attention to. You can see them highlighted in the picture below.
1. The element you want to find more about – in this case h1 tag
2. The HTML code for the h1 tag you are inspecting at the moment
3. The CSS code for the h1 tag you are inspecting
4. A link to the file that contains the needed CSS code which should be edited later

Using Firebug
Open your blog or website and inspect an element. In this case we will edit the h1 title. We don’t like the font size so we want to increase it.
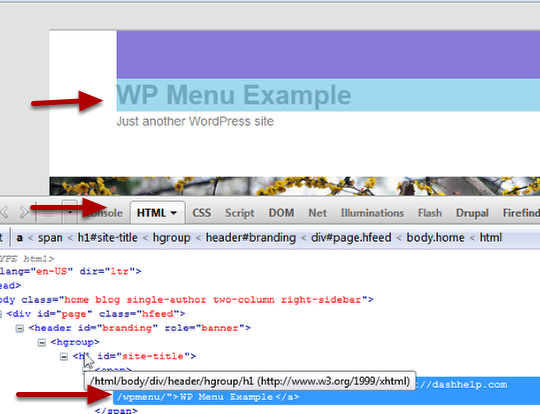
When I highlighted the website title in the browser and clicked the ‘Inspect element with Firebug’ option. Once the Firebug opens another window where I can see the HTML code. It even shows the title as blue, so I know I have selected the right element to inspect.
If I want to get a little more information or to inspect another element of the page, I simply go to the window on the lower left and mouse over the lines of code. You will notice that different highlights appear in the main browser window. This means that every time I hover over a certain HTML code, the certain element on my web page will be highlighted.
In this case, I have placed the mouse over the h1 title. The blue color shows the element and the purple color shows the spacing that is defined for this element. You cannot see this unless you mouse over the correct part of the HTML code.
Make temporary changes
As mentioned, Firebug lets you test different styles, colors and font sizes on your website without making permanent changes. This is very useful as you can see what you need to change before you even make a permanent change in the CSS file. In this case, we will experiment with the padding.
1. Move your mouse cursor over to the space next to padding and a gray circle will appear
2. Click the circle
3. It will change to a red circle
4. This means that with a simple mouse click we disabled the padding for this element
5. You can click the red circle again to enable the padding
6. Put the mouse over the padding value and edit it to 10px, 10px, 10px, 10px
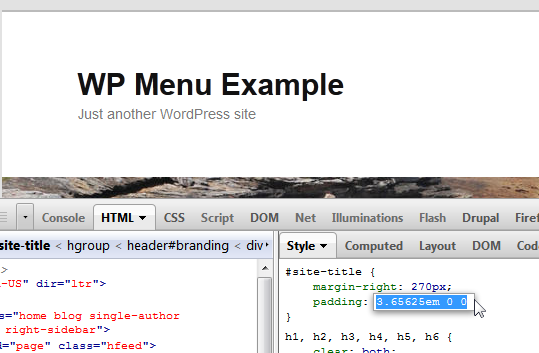
As you type the changes, you will see the padding change in the browser immediately. If you are not sure about it, you can change the value to, say, 10000px, and you will notice everything becomes distorted. You can also change the font size to 50px and you’ll notice the h1 tag increased. But no worries as this is just to help you understand how the whole thing works and no permanent damage has been done to your website.
Saving changes to the CSS file
Now, once you have increased the font size at a temporary level, you may want to save these changes. Go to the Style window and look at the right. There you will find the stylesheet name (it’s usually style.css) and the line in the stylesheet that will have this code.
Put your mouse on the name on the stylesheet and right click for the context menu. Click open in a new tab.
Now you can copy the location to your clipboard or open it in a new tab.
You will be able to see the complete URL to the stylesheet you need to edit.
Now just go to the server using an FTP client and open the style.css file with notepad or any other text editor. Make your changes and save the file. Upload the new stylesheet file and your changes will be saved.