How to Manage WordPress Settings?
Manage WordPress Settings
Before we can start designing our website and adding content, it’s important that we choose proper settings for the website.
Settings Panel
The settings panel can be found on the navigation bar on the left (see the screenshot to locate). It has sub options – General, Writing, Reading and few more. Let’s have a look at the options provided under each tab and their functions.

General Settings
- Title and Tagline: Write your website “title” and “tagline” in the respective field. This will show up in the header of your website. If your theme does not support the data entered here then you will have to write the site title and tagline in the Theme Settings. The default WordPress theme do support the data written here.
- WordPress Address: It is the URL where your wordpress is installed. For example my wordpress is installed in the main directory. So for me it is – ‘https://wordpresstraining.com.sg.’
- Site Address: It is the URL to your home. If you want your site homepage to be different from the directory you installed WordPress then mention the page URL here. But it’s recommended to leave this field with its default URL.
- E-Mail Address: It is the email id where all the admin notifications will be sent like new user registration, new comment, etc.
- Membership: By selecting this option you can allow people to register on your website. Select this option only if your website really needs people to register.
- New User Default Role: This option chooses the default role to be assigned to the person registering on your website. It’s recommended to keep it as “Subscriber”. You can change a user’s role later by going to “Users” on the navigation panel.
- Choose these settings as per your need:
- Time Zone
- Date Format
- Time Format
- Week Starts On
Writing Settings:
- Formatting: Choose the settings as needed.
- Default Post Category: This is the category to which the article will belong by default.
- Default Post Format: By default your post will be of the format you choose here.
- Press This: This is a very nice feature of WordPress to clip text, images and videos from any webpage. Just drag and drop the “Press This” button to your browser bookmark area. Then go to any webpage, select the content and then click on “Press This” from your browser’s bookmarks. A new panel with wordpress post editor will open up with the content you selected.
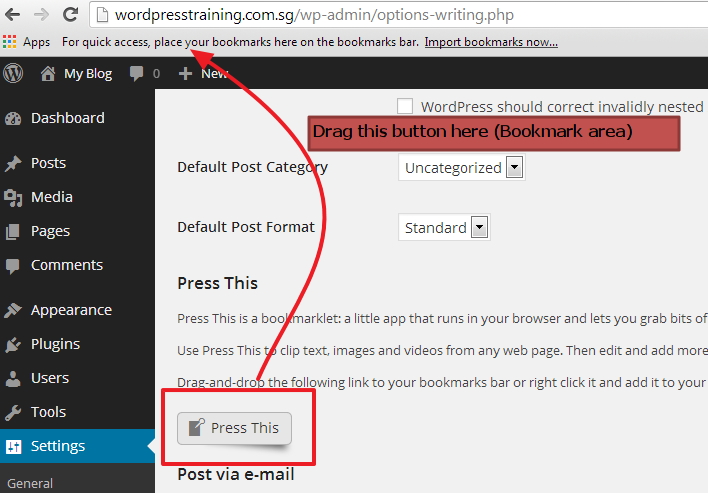
Setting up the “Press This” button
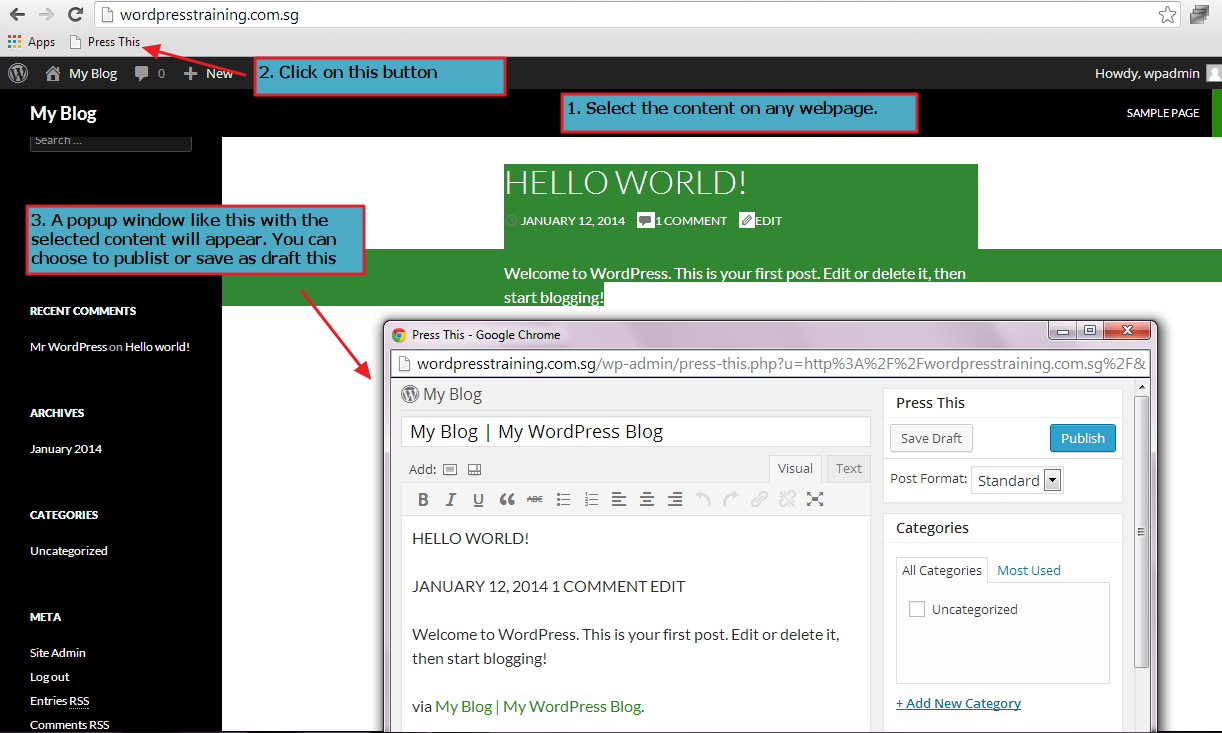
Using the “Press This” Button
- Post via e-mail: You may setup post via-email to post to your wordpress website through email.
Reading Settings:
- Front Page Display: Here you can choose what to display on your home page. This setting may be over written by the theme settings depending upon the theme you use.
- You may choose the other settings as per your needs
Discussion Settings:
Here you will manage settings about the comments on your website.
- Most of the settings are self explanatory. You may choose the settings as per your needs.
- It is recommended that you select “to manually approve comments” under the ‘before a comment appears’ tab to help in not allowing spam comments to be posted which is a very frequent case.

- You may use “Comment Blacklist” to mark the comment as spam if it contains the words, URL, email or IP you mention in this box.
- You may choose the avatar settings as per your needs.
Media Settings
- Choose the image sizes under different tabs as per your needs. You may leave it as defaults too.
- Uploading Files: Choose whether you want to structure you data in month and year based folder. It’s recommended to check this for easy management of your media unless you are using some plugin for media management.
Permalinks Settings
This is a very important settings and it decides the URL for your articles and other pages. By default the URL for articles contains question mark and lots of numbers. This affects your website SEO and decreases readability. It is recommended you change the default permalink.
You may also make a custom permalink by using custom tags provided here.

Limit Login Attempts
If you had checked “Limit Login Attempts” option during the installation then you will see this option on the left menu bar.
You may choose the settings as per your needs. The default settings are good enough for your website security, but you may change if you wish.
If you liked our website, please share it with your friends using the share buttons below.